Alexey Zakhlestin's Blog

Programming for Mac and Web

Using Python With GObject Introspection

Permalink

I was recently working on one small tool for Midgard Project, and had to deal with a new framework: PyGI. Strictly speaking, it’s not “totally new”, but it is: a) new for me b) just starts to get attention from application developers.

PyGI is a project, which implements dynamic bindings to GObject based libraries for Python using GObject Introspection. Initially, it was a separate project, these days it is merged into main PyGObect. If you read my previous posts, this is kinda what we want to implement for PHP in GObject for PHP project, but for Python.

For the project, I used Python 3. This choice led to the requirement of installing latest versions of software, but the good news is, that coming Ubuntu Natty has a good initial set of software. So, I had to install:

The main library, I worked with — libmidgard2 — supports GObject introspection, so I didn’t need to install anything python-related to make it work.

Ok. Here are some hints on coding using PyGI.

1
2
3
4
5
6
7
8
9
10
11
12
13
14
15
16
17
18
19
20
21
22
23
24
25
    # to use introspection-friendly library use import statement similar to this
    from gi.repository import Midgard

    # global functions are available directly in imported package
    Midgard.init()

    # constructors are ALWAYS called with "named" parameters
    config = Midgard.Config(dbtype = "SQLite", database = "testdb")

    # library errors are thrown as exceptions
    import gobject
    try:
        do_something()
    except gobject.GError as e:
        print(e.message)

    # want to know name of objects GType?
    print(obj.__class__.__gtype__.name)

    # want to get list of non-object properties of some GObject?
    property_names = [pspec.name for pspec in obj.props if not pspec.value_type.is_classed()]

    # need to get names of all classes, which inherit from your GObject's class?
    # (note: Midgard.Object is the class to be replaced by your class)
    child_names = [gtype.name for gtype in Midgard.Object.__gtype__.children]

On Feature-branches and Pull-requests

Permalink

Everyone and their mother uses Git + GitHub combo these days. A lot of open-source projects accept patches using github’s pull requests, because… well, because it is the easiest way to review and accept patches.

But, novice Git users don’t know how to do this optimally, and “naive” approach leads to complexities. Git is a distributed version control system, which means that everyone can “commit” to their copies of repositories. Syncing these commits with upstream is a bit more difficult and leads to commit-conflicts sometimes. So, here’s aforementioned “naive” approach:

  1. Fork upstream github repository
  2. Clone forked repository to local machine
  3. Make changes
  4. Commit
  5. Push
  6. Send Pull Request

It will work, but, there’s one non-obvious thing: pull request, probably, won’t be merged immediately and there are high chances, that there will be some commits commits pushed to official repository before our commit is merged. As the result, we have a conflict between upstream repository and our forked repository. So, at this point, if we plan to use our forked repository again, we have to “merge” upstream changes. It’s not end of the world, and git, if we’re lucky enough, will do this merge automatically as part of ”git pull upstream”, but it won’t be “fast-forward” merge and github’s ”Network” diagram (or branches diagram in your favourite git GUI) won’t be nice and clean anymore.

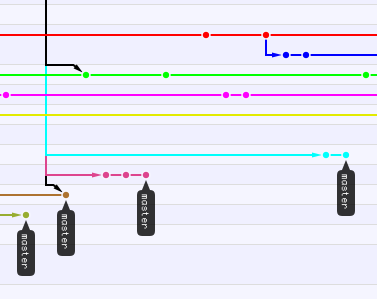
There’s better approach, and it’s name is ”Feature Branches”. It’s quite simple. Once you have cloned forked repository (i.e. after steps 1-2), use ”git checkout -b new_branch_name” command (it’s nice, if “new_branch_name” summarises changes you’re going to implement). This command creates new branch, starting from current “master” and makes it active. Make changes and commit them: “master” branch is left intact and all the things you changed sit nicely in this new branch. Now, push these changes with ”git push origin new_branch_name” command. This will send your new branch to github. Now, open this branch on github and send Pull Request from your “new_branch_name” to upstream’s “master”, as usually.

Use ”git checkout master” to return to the “master” branch, and, whenever upstream merges your changes, and you pull those, they will appear here automatically, without a single “merge” effort from you. As a bonus, you get beautiful tree of branches without complex knots.

On PHP’s Webserver

Permalink

There are a lot of talks today about “Built-in web server” [for PHP] RFC by Moriyoshi Koizumi. There is a nice discussion on Hacker News (and 2 threads on reddit: here and here). So, here’s couple of cents from me.

1. That is a great addition to the standard PHP tool-set. I remember days, when I had to configure web-servers to run my web-projects and it was ridiculously distracting. It’s not “rocket science”, but still complicates matters a lot. Finally, developers would be able to forget about these monstrous WAMP/XAMPP/whatever packages and just run their applications using “php -S localhost:8080”.

2. Dear developers, please, do not expect this to handle production load. This web-server is solely for localhost developer needs. It is a single-process, single-threaded, blocking http-server.

3. If you’re looking for the solution, which is similar Ruby’s Rack or Python’s WSGI this is not it. But AiP (formerly ”AppServer in PHP”) is: it lets your application pre-initialize classes (and keep them in memory between requests), pre-open database connections, pre-warm caches, etc. and serve application with a fast multi-processed server (you can choose from HTTP, SCGI and ØMQ/Mongrel2 protocols). And it is still as easy to start bundled http-server: “aip app path/to/application”

Various versions of AiP are used in production on several large projects and show nice results (it is stable and really fast). And we’re planning to release next major version really soon now. If that sounds interesting, join our discussion group and watch the project on github

GObject for PHP (New Bindings Project)

Permalink

Today, my brain refused to recall details of mercurial commands and I moved GObject for PHP project to github.

I didn’t mention this project on blog, but that is only because I wasn’t blogging much lately. :)

It’s been in the news, that PHP-GTK ”is being split up into different projects, PECL/Cairo, GLib, GObject, etc”, but there were not many details on these changes. It’s time to fill the gap.

I was working on “GObject” part from the list. Our idea is to get rid of legacy code, target php 5.3+ and build highly modular system, which would be easy to extend and maintain.

This new PHP extension is called “GObject for PHP”, so, my main concern, obviously is building comfortable bridge between GObject objects and PHP’s objects. It starts to work, but there’s a lot of stuff to be done. Please join the project, if you are interested. We need more hands! :) Anyway, here’s what is done:

“master” branch

I started my implementation with “master” branch. I see it as a common ground for various specific php extensions wrapping gobject libraries. For example, Mark Skilbeck implemented libnotify binding this way. Eventually, new generation of GTK+ bindings could be implemented in similar fashion.

At the moment I have PHP counterparts of the following parts of GObject world:

  • GType — implemented as GObject\Type. This is the scaffolding, which is used for creating new classes in runtime.
  • GParamSpec — implemented as GObject\ParamSpec. These describe properties and are assigned to GObject\Type.
  • GObject — implemented as GObject\Object. Base class for all specific classes in GObject hierarchy.
  • GSignal — implemented as GObject\Signal. Signal’s are definitions of event slots. Whenever you define new GObject class (using GType) you can specify which event slots it will have, how those events should be handled and, after that, during runtime, trigger events.

So, it’s easy. Define classes, properties, signal slots. Create objects, set properties, emit signals. GObject-for-php takes care of event marshalling, conversion of parameters, etc.

“introspection” branch

After the code above started to work, I branched the code to give another concept a try. These days, a lot of effort in GNOME community goes into GObject Introspection project. They idea is, that bindings developers spend too much time by manually tweaking bindings to every change in C libraries. That’s what PHP-GTK team had to do, for example.

Here’s quotation from project’s web site:

The introspection project solves this by putting all of the metadata inside the GObject library itself, using annotations in the comments. This will lead to less duplicate work from binding authors, and a more reliable experience for binding consumers. Additionally, because the introspection build process will occur inside the GObject libraries themselves, a goal is to encourage GObject authors to consider shaping their APIs to be more binding friendly from the start, rather than as an afterthought.

So, “introspection” branch aims to provide bindings for GObject Introspection infrastructure. The main entry point is GIRepository\load_ns(‘Namespace’) function, which creates php-counterparts of all classes, functions, constants of corresponding GObject namespace dynamically. At least, it will do that one day. With your help :-)

Chronograph 1.4.0

Permalink

Today, I am introducing Chronograph 1.4, latest version of our Time Tracking application for Mac OS X.

We consider it a minor release, yet, it adds some nice additions to the feature set.

1. Idleness Detection

Did you ever find yourself in situation, when you start time-tracking for the task, walk away from the computer and just forget about it. Then, you find all this time tracked. Sure, you can edit time post factum, but still there’s a need to figure out how much time you actually spent working.

Here’s the solution:

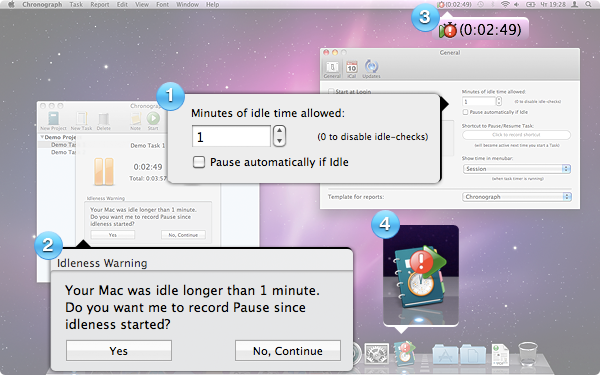
  • Open Preferences… and set ”Minutes of idle time allowed(point 1) to some value larger than zero.
  • Whenever you run track time and computer is idle for this amount of minutes a new dialog will jump out (point 2), which will allow you to record only the time before idleness started. Additional notifications will be shown in menubar (point 3) and dock (point 4)

Setting it back to 0 will disable idleness detection.

2. New Report Modes

Chronograph 1.3 report facilities allow you to see how much time did you spend daily on Task or Project during requested period.

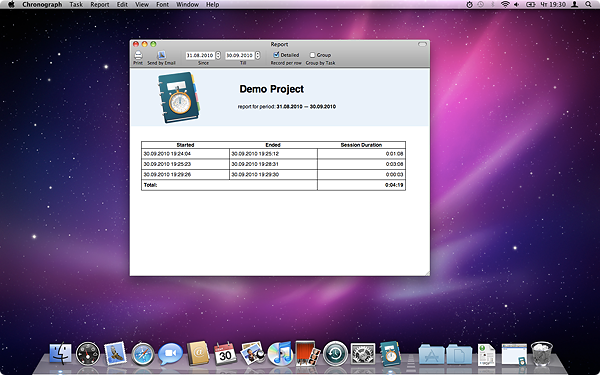
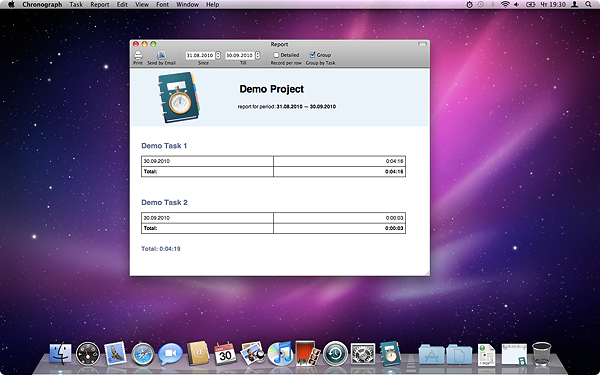
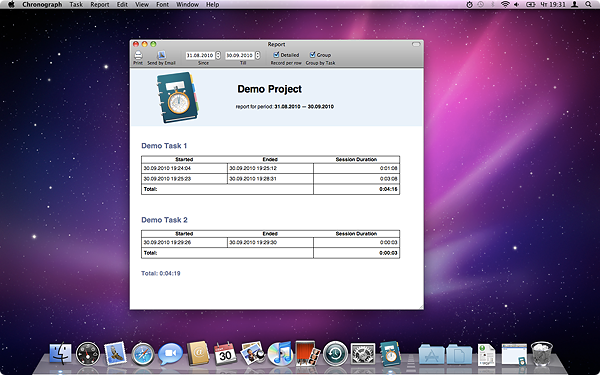
Chronograph 1.4 goes further and introduces 3 new kinds of reports

A. Detailed report for Task/Project

shows all sessions of tracked time during requested period

B. Grouped report for Project

shows how much time you spent daily during requested period grouped by Task

C. Grouped Detailed report for Project

shows all sessions of tracked time during requested period grouped by Task

3. Time in menubar area

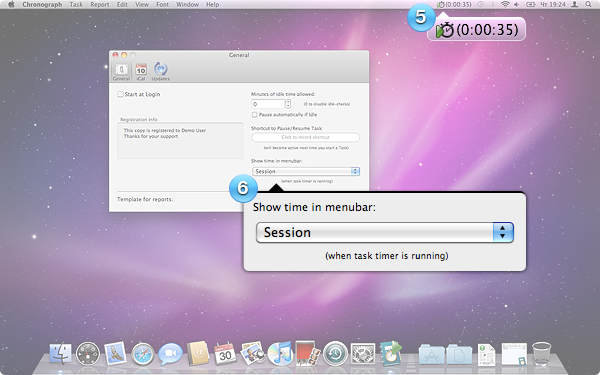
There’s a new pull down menu in Preferences called ”Show time in menu bar(point 6). Default is ”none”, which means that only icon is shown in menubar, but you can also chose tho show Session time, total Task time and total Project time. Example is shown on (point 5)

4. Reworked timer sheet

We’re not longer showing spinning circle in timer sheet. Instead, we show you current Session time and either total Task time or total Project time. To switch between task/project time just click on time shown.

You can get this version here: Chronograph 1.4.0.dmg

Pake 1.4.0 Is Released

Permalink

I just released new version of Pake.

Pake is a command line utility for executing predefined tasks, inspired by make. It is written in PHP and the tasks are also described in PHP. Pake can be used for compiling projects from different pieces, generating code, preprocessing templates and deploying projects.

If you know Phing, then Pake is a similar thing, but doesn’t use XML, is easier to use and faster.

Here’s the brief Changelog:

  • added “interactive mode” (pake -i)
  • new helper: pakeMercurial (in addition to pakeSubversion and pakeGit we already had)
  • updated sfYaml library
  • use copy+unlink instead of rename in pake_rename() to workaround problem of moving files between volumes
  • “pake compact” (developers-only) command works again
  • added explicit pakePearTask::package_pear_package($file, $target) method
  • fixed output-formatting (long texts in exceptions, etc.)
  • various packaging fixes

All Pake 1.x versions are compatible with php-5.2. Earlier versions might work, but those are not tested.

If you need automation tool for your project, then Pake might be exactly what you need.

Useful links:

Ode to Mb_ereg Functions

Permalink

PHP has some sets of functions, which are not known to the wide audience. One of those is mb_ereg_* family of functions.

There is a common misunderstanding, that mb_ereg_* functions are just unicode counterparts of ereg_* functions: slow and non-powerful. That’s as far from truth as it can be.

mb_ereg_* functions are based on oniguruma regular expressions library. And oniguruma is one of the fastest and most capable regular expression libraries out there. Couple of years ago I made a little speed-test.

Anyway, this time, I was going to tell about it’s usage. PHP-documentation isn’t telling much.

Let’s start with the basic fact: you don’t need to put additional delimeters around your regular exprsssions, when you use mb_ereg_* funcitons. For example:

1
2
3
<?php
// find first substring consisting of letters from 'a' to 'c' in 'abcdabc' string.
mb_ereg('[a-c]+', 'abcdabc', $res);

To execute same search, but in case-insensitive fashion, you should use mb_eregi()

mb_ereg(), mb_eregi() and mb_split() functions use pre-set options in their work. You can check current options and set the new ones using mb_regex_set_options() function. This function is parametrized by string, each letter of which means something.

There are parameters (you can specify several of these at the same time):

  • ‘i’: ONIG_OPTION_IGNORECASE
  • ‘x’: ONIG_OPTION_EXTEND
  • ‘m’: ONIG_OPTION_MULTILINE
  • ’s’: ONIG_OPTION_SINGLELINE
  • ‘p’: ONIG_OPTION_MULTILINE | ONIG_OPTION_SINGLELINE
  • ‘l’: ONIG_OPTION_FIND_LONGEST
  • ‘n’: ONIG_OPTION_FIND_NOT_EMPTY
  • ‘e’: eval() resulting code

And there are “modes” (if you specify several of these, the LAST one will be used):

  • ‘j’: ONIG_SYNTAX_JAVA
  • ‘u’: ONIG_SYNTAX_GNU_REGEX
  • ‘g’: ONIG_SYNTAX_GREP
  • ‘c’: ONIG_SYNTAX_EMACS
  • ‘r’: ONIG_SYNTAX_RUBY
  • ‘z’: ONIG_SYNTAX_PERL
  • ‘b’: ONIG_SYNTAX_POSIX_BASIC
  • ‘d’: ONIG_SYNTAX_POSIX_EXTENDED

Descriptions of these constants are available in this document: API.txt

So, for example, mb_regex_set_options('pr') is equivalent to mb_regex_set_options('msr') and means:

  • . should include \n (aka “multiline-match”)
  • ^ is equivalent to \A, $ is equivalent to \Z (aka “strings are single-lined”)
  • using RUBY-mode

By the way, that is the default setting for mb_ereg_* functions. And, mb_ereg_match and mb_ereg_search families of functions take options-parameter explicitly.

So, back to functions:

1
2
3
4
5
6
7
<?php
// make sure, that the whole string matches the regexp:
mb_ereg_match('[a-c]+', $user_string, 'pz'); // 'pz' specifies options for this operation
                                             // (multiline perl-mode in this case)

// replace any of letters from 'a' to 'c' range with 'Z'
$output = mb_ereg_replace('[a-c]', 'Z', $user_string, 'b'); // use basic POSIX mode

Ok, these were easy and similar to what you’ve seen in preg_* functions. Now, to something more powerful. The real strength lies in mb_ereg_search_* functions. The idea is, that you can let oniguruma preparse and cache text and/or regexp in its internal buffers. If you do, matching will work a lot faster.

1
2
3
4
5
6
7
8
9
10
11
<?php
mb_ereg_search_init($some_long_text); // preparse text
mb_ereg_search('[a-c]'); // execute search
while ($r = mb_ereg_search_getregs()) { // get next result
    // work with matched result
}

mb_ereg_search('[d-e]'); // execute different search on the same text

mb_ereg_search_init($some_other_text); // preparse another text
mb_ereg_search(); // execute search using previous (already preparsed) regexp

This is the fastest way of parsing large documents in php, as far as I know.

Notes on charsets. Though, it is often mentioned, that mb_ereg_* functions are “unicode”, it would be more practical to say, that they are encoding-aware. It is a good idea to specify, which encoding you use beore calling oniguruma.

Some options:

1
2
3
4
<?php
mb_regex_encoding('UTF-8');
mb_regex_encoding('CP1251'); // windows cyrillic encoding
mb_regex_encoding('Shift_JIS'); // japanese

Check the full list of supported encodings.

DNS SRV-records Support in HTTP-browsers

Permalink

Ten years ago, today, on september 20, 1999 bug titled “DNS: RFC 2782 not supported (SRV records)” was submitted to Mozilla. Today, in 2009, bug has patch attached, but it is not committed and waits for approval. I doubt, that is the longest-living bug in mozilla, but, still, 10 years is a great age for a bug. Let’s party! :)

Now, some of my readers, are probably asking themselves: what is it all about? why is this bug important? Ok. Let’s find out!

How does browser usually find which server to ask, when you enter URL? Well, at first, it parses out protocol and domain name from URL. For example, if URL is http://www.example.com/page.html then protocol is http and domain name is www.example.com. After that, browser sends request for “A” type record to DNS server and server replies with IP address (or several IP addresses). After that, browser tries to open connection with these addresses one by one, until it finds one which really works. Hopefully, first one will work, but sometimes each one will fail; In this case, browser will show us an error.

“A” records have the following format:

    hostname    IN  A   ip-address  time-to-live

For basic cases, this scheme seems to work just fine, but it has some inherent flaws, when you start to think about scalability.

  1. It is impossible to map different services on the same domain-name to different servers. For example: I can’t have FTP and HTTP servers responding on example.com and, at the same time, located on different physical machines. My only option would be some kind of router, which would forward requests on different ports to different IP’s.

  2. It is impossible to map service to specific port of server. Browsers just looks for TCP-connection on port 80 while using HTTP, for example.

  3. It is impossible to implement sophisticated load-balancing rules in DNS. Having several A-records in DNS just gives possibility to have equal-load of several machines, nothing fancy.

It is an interesting fact, that all this problems are solved long time ago for one specific protocol called SMTP (yes, the one which delivers emails all around the globe). SMTP uses special kind of DNS-records called “MX” which allow to specify which machine(s) are waiting for SMTP-connections targeted to domain name and allow to specify priority of these machines, so, at first, clients will try to access machines with high priority and in case of problems will fallback to low-priority ones. So, MX records make email-infrastructure seriously more robust and scalable then anything else. Why such special treatment?

“MX” records have the following format:

    domainname  IN  MX  priority    hostname  time-to-live

Here, RFC 2782 comes on scene. Idea of this standard is to achieve similiar flexibility for any protocol used on internet.

“SRV” records allow to specify that specific application protocol, used over specific transport protocol of this domainname is handled by several servers on specific ports with various priority. That is as flexible as it can be. Let me throw some examples:

    _http._tcp.example.com. 86400 IN SRV 0 5 81 www1.example.com.
    _http._tcp.example.com. 86400 IN SRV 0 5 80 www2.example.com.
    _http._tcp.example.com. 86400 IN SRV 1 9 81 www-backup.example.com.
    _http._tcp.example.com. 86400 IN SRV 1 1 8000 www-weak-backup.example.com.

These four records tell browser, that:

  • HTTP-over-TCP connections for “example.com” domain are handled by 4 servers: www1.example.com on port 81, www2.example.com on port 80, www-backup.example.com on port 81 and www-weak-backup.example.com on port 8000.

  • www1.example.com and www2.example.com have priority “0” (highest), so should be first to try. Both have weight “5”, which means, that they have 50% chance to be selected by client (equal load)

  • In case both of these are not reachable, browser should check lower-priority servers www-backup.example.com and www-weak-backup.example.com, but www-backup.example com should be preferred in 9 out of 10 cases (it has weight=9, while another one has weight=1).

Sounds pretty cool, but, unfortunately, this technology is still not implemented in any of the browsers. Mozilla(Firefox) has this bug for 10 years, WebKit has this bug for 3+ years and Chromium has this bug since today.

There is no need for special support on webserver-side — that’s a good side of this technology too. Just add relevant records to DNS-server and all compliant clients will see it.

At the moment, SRV-records are widely used by XMPP/Jabber, SIP, LDAP software and Kerberos. I believe, any protocol in use can benefit.
XSLCache in PECL

Permalink

XSLCache extension for PHP, originally developed by NYTimes started its second life in PECL’s repository and I am proud to announce first PECL-release.

The XSL Cache extension is a modification of PHP’s standard XSL extension that caches the parsed XSL stylesheet representation between sessions for 2.5x boost in performance for sites that repeatedly apply the same transform. API-wise it is compatible with usual XSL extension with two small exceptions:

  1. instead of XSLTProcessor class you should use XSLTCache class.

  2. importStyleshet method has another “signature”: void importStylesheet(string $path, bool $cachesheet=true);

Installation, from now on, should be as simple as ”pecl install xslcache